Acoustic wall coverings for sound absorption and improvement of room acoustics are increasing in popularity. And no wonder, it isn’t just an important element of decorative room design for interior designers, it is also suitable for hobby decorators and do-it-yourselfers. But what exactly is behind this trend, what are the advantages and how can you easily build an acoustic wall covering yourself?
This aixFOAM Knowledge Base article contains the most important facts about creating acoustic wall covering step-by-step.
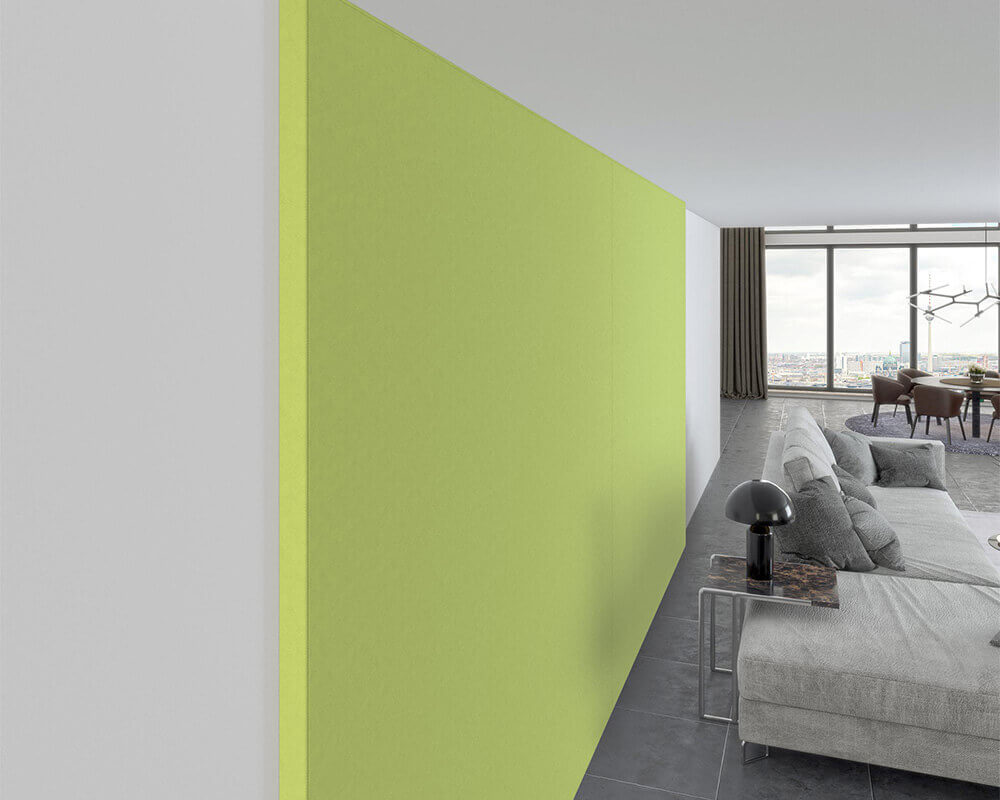
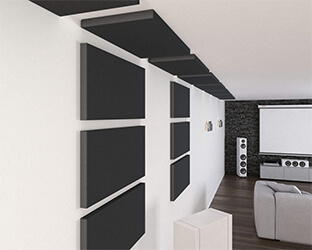
Acoustic wall covering is a complete solution from modern interior design that includes both acoustic and decorative properties. Sound absorbers are covered with a special acoustic material, hiding them discreetly behind the covering. The textile surface created in this way provides an interesting alternative to conventional wallpaper and stands out thanks to its high-quality appearance. Wall covering is particularly popular in cinemas and theatres, in the catering and hotel sector, and also in the living area and in home cinemas.
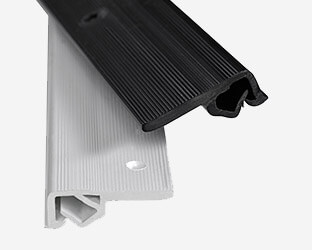
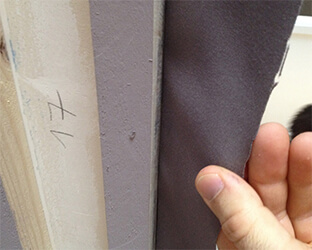
A substructure made of square-profile batons (optionally aluminium profiles) and special wall covering profiles is usually created to tension the acoustic material. Sound insulation mats are used in this frame. With the help of a special spatula, the sound-permeable fabric is then easily stretched over the sound absorbers in the clamping profiles.
Using this technique, entire wall surfaces, or even just sections of wall or elements such as sliding doors, can be effectively soundproofed and covered.
Acoustic wall covering offers a multitude of additional functions and advantages compared to conventional wallpaper, which go beyond the mere aesthetic character.
Effective and discreet soundproofing
The combination of the broadband absorbers inside the wall covering and the special sound-permeable acoustic material creates a highly effective soundproofing element. The sound absorbers reduce reverberation and noise and, if the wall is completely covered, prevent sound from reaching adjacent rooms. Balanced room acoustics make a decisive contribution to well-being.Creative accents in interior design
Acoustic wall covering is a creative building block for interior design. The textile surface of the coloured acoustic fabrics ensures variety on the walls and impresses with its aesthetic appearance. In the aixFOAM shop you can choose your favourites from 18 different colours and create harmonious compositions or add exciting accents.Thermal insulation, indoor climate and living comfort
In addition to the acoustic and purely decorative aspects, full-surface wall covering is particularly convincing with another effect: The sound absorbers inside the acoustic wall act as additional thermal insulation and prevent heat from escaping unused through the wall. It also increases the surface temperature of the wall, which noticeably improves comfort and living comfort.Easy assembly and maintenance
Our washable aixFOAM acoustic fabrics can be easily attached to the soundproofing mats without any prior knowledge using the clamping profiles and the special spatula. This system also makes it possible to remove and replace the fabrics just as quickly. This means that the colour of a wall can be changed - and this without painstaking painting and wallpapering work that creates dirt.Before we start creating an acoustic wall covering in point 5, here are some important tips for preparation, tips for planning your wall covering and our recommendation for tools and materials.
To get the best possible result and high-quality wall covering, note the following points before starting work:
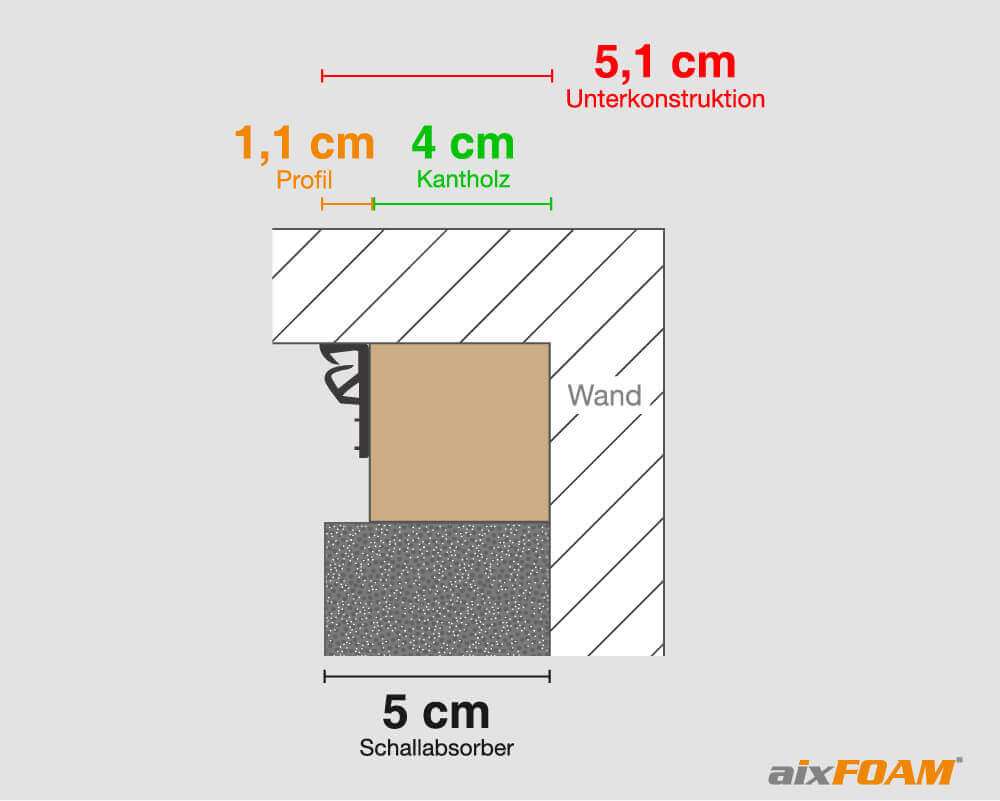
The aixFOAM wall covering profiles for tensioning the fabric are extremely robust and can be flexibly adapted to the size of your wall covering. However, the profiles themselves have only a small height (approx. 1.1 cm).
Therefore, make sure that the height of the substructure, which we build from square-profile baton, together with the profiles corresponds at least to the height of the sound absorbers, so that the final textile surface hovers directly above the absorbers. This means that with sound absorbers with a thickness of 5 cm, the height of the substructure must also be at least 5 cm.
Before you start building the substructure, it is worth investing some time in planning the wall covering. This will enable you to keep a precise overview of the materials and tools you’ll need. You’ll also avoid problems when building the wall covering as well as unnecessary costs.
To show you what you should consider when planning the materials for your wall covering, we have prepared three different examples.
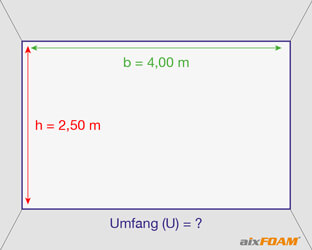
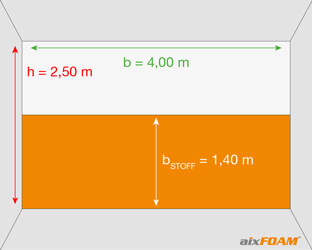
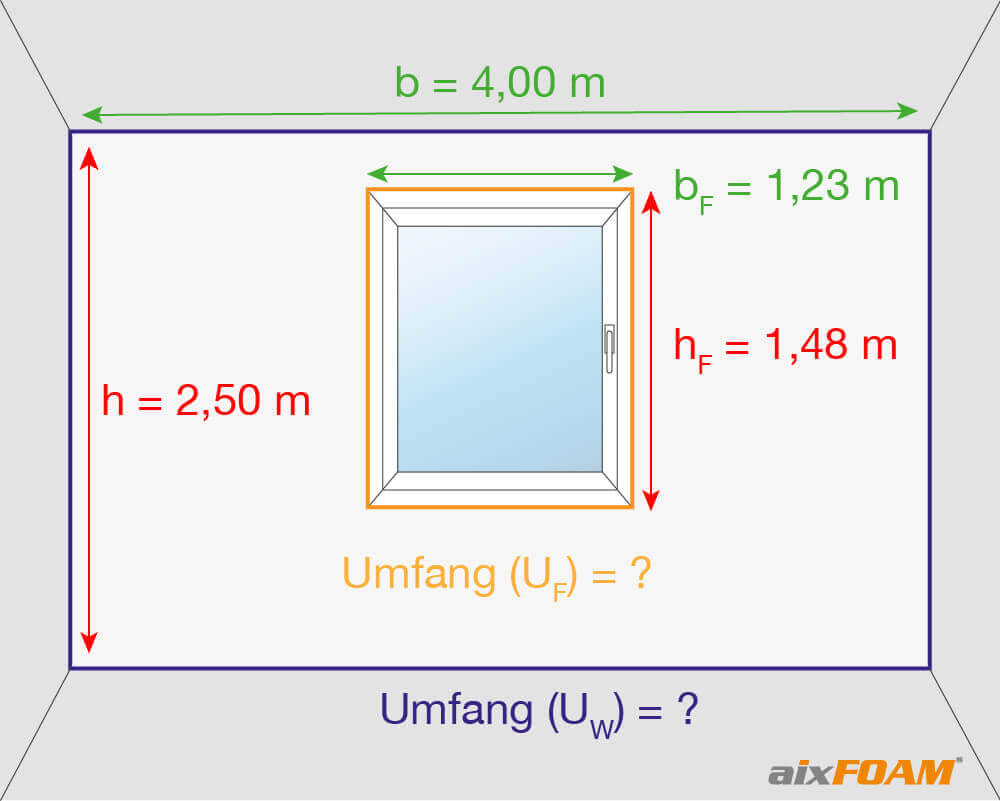
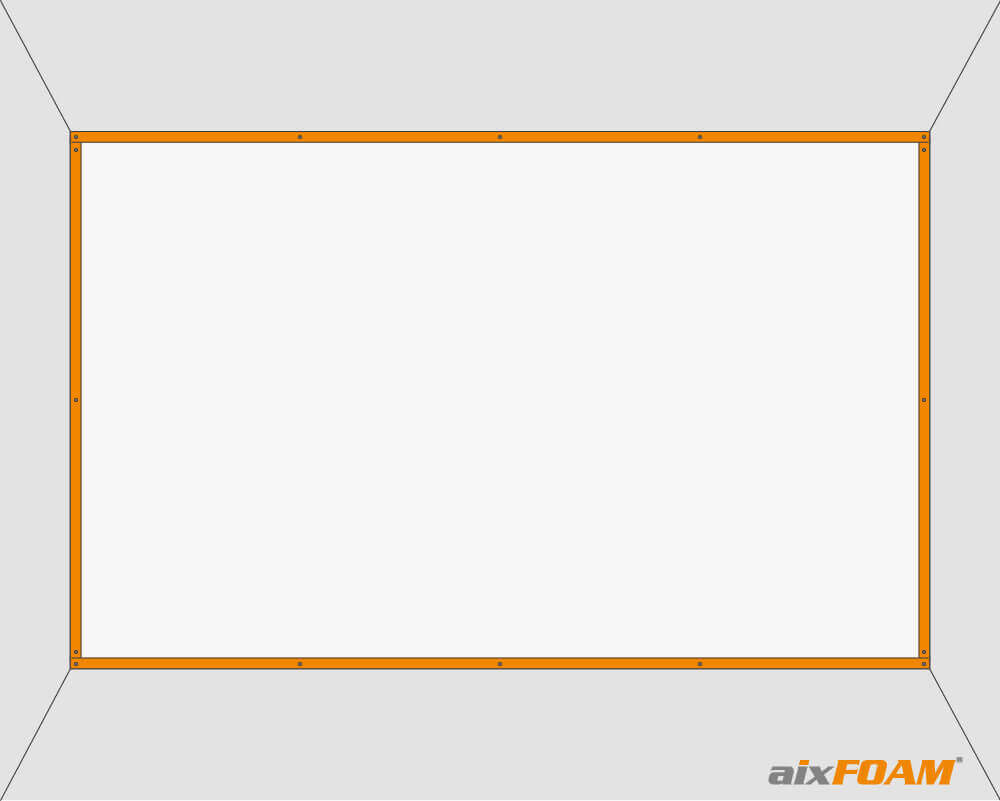
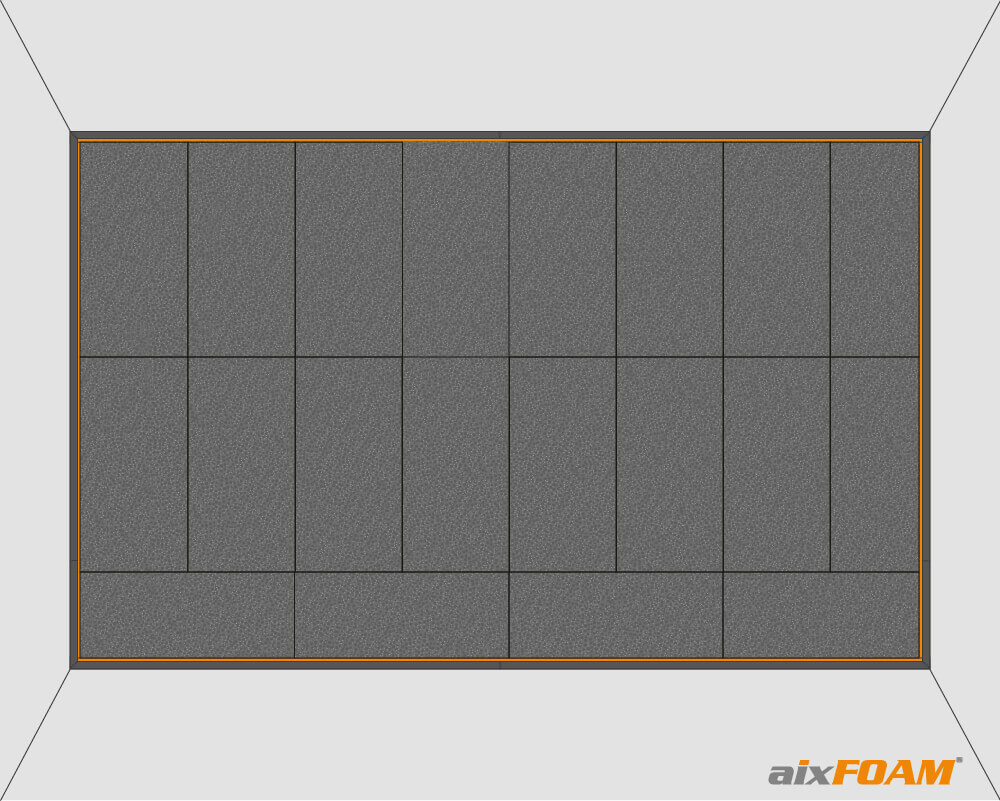
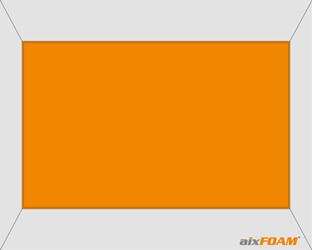
In our first example, we want to cover the entire surface of the wall. To do this, we first measure the height and width of our prepared wall surface. This results in a wall height (h) of 2.50 m and a wall width (w) of 4.00 m.
Based on these two values, we can already see how much acoustic material we need. The acoustic fabrics in the aixFOAM shop - apart from the cream white colour - have a minimum length of 5 m and a roll width of 3 m. This means that we can completely tension the wall with one unit of the acoustic material without dividing it into partial segments. You can find out more in section 4.2.
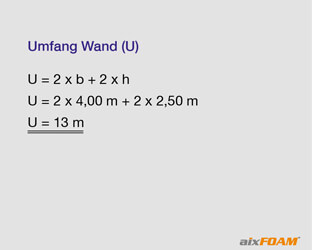
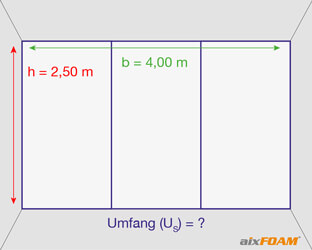
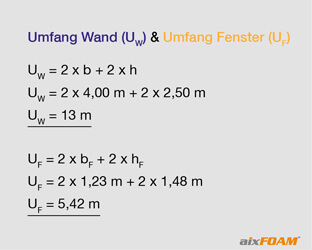
To determine how many square-profile batons and wall covering profiles we need for the substructure, we first have to determine the circumference of the wall. In our chosen example we need 13 m.
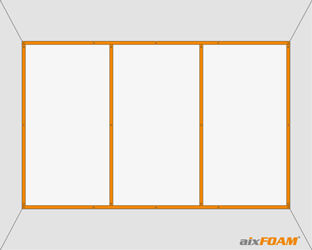
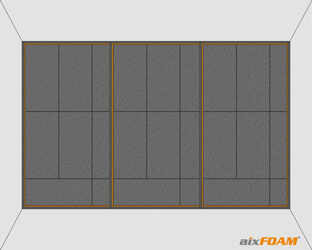
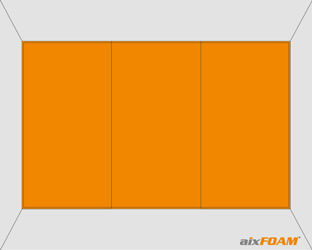
A division of the wall into segments is always sensible or necessary if the fabric width or the width of the fabric are not large enough to completely cover the wall surface.
For easier understanding, here is the following example: If our fabric has a roll width of 1.40 m and we need to work with the spatial dimensions mentioned above (2.50 m x 4.00 m), the fabric will not be wide enough to cover the wall completely.
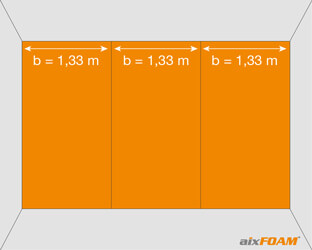
However, if you divide the wall into three segments of the same size, each 1.33 m wide and 2.50 m high, the roll width of 1.40 m (including a few centimetres of grip allowance) is ideal for covering all three segments. However, the fabric should then be at least 7.50 m long (plus a few centimetres of grip allowance) so that you have enough fabric for three panels.
If the wall surface is divided into segments, the substructure must also be adjusted accordingly so that the segments are divided individually.
An important clue: The aixFOAM wall cover profiles can easily accommodate panels coming from two directions. This means that we only need one clamping profile on two directly adjacent wall segments. However, the profiles must be cut exactly so that the fabric can later be clamped into the profile from both sides without interruption.
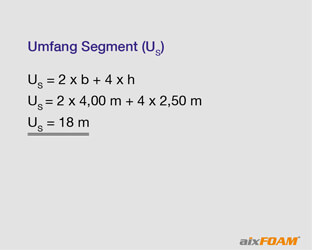
In order to precisely calculate the need for square-profile batons and profiles, we not only have to consider the edge length of the wall, but also the two roll widths for the division into segments. Therefore, we add four times the height of the wall to double the wall width. This results in a requirement of 18 m.
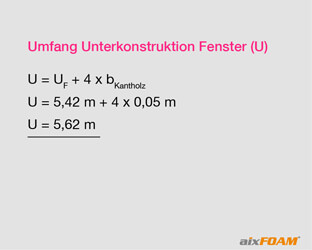
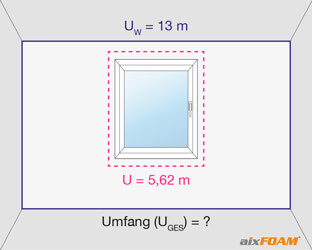
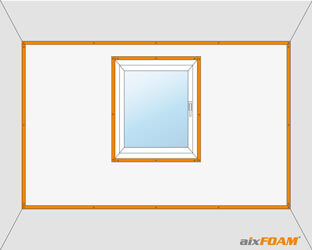
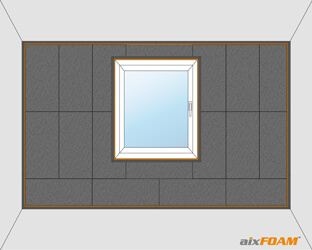
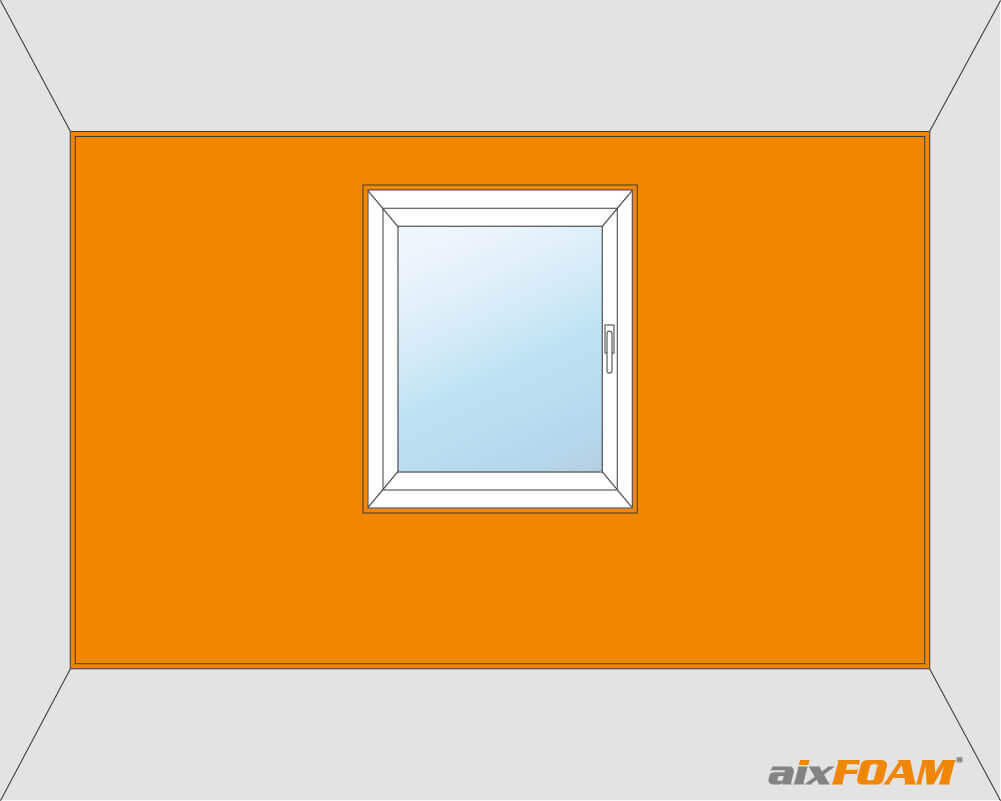
In the case of a complete wall covering with a recess (e.g. for a window), we can also calculate how many square-profile batons and wall covering profiles we need. For this we first have to determine the edge length of our wall again. From the dimensions of our window - we have chosen a standard dimension of 1.23 m (wW) x 1.48 m (hW) - we can determine the edge length of the window.
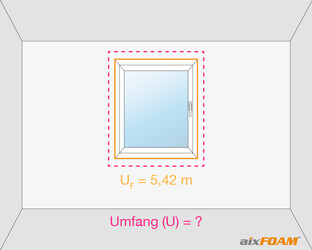
However, we must note that the determined edge length of the window only represents the internal dimension of our subsequent frame construction. In order to determine the exact dimension of the substructure (external dimension) along the window, we must now take into account the width of the selected square-profile batons, which in our example are 5 cm. For this we add four times the width of our square-profile batons to the previously determined edge length of the window. Finally, there is a edge length of 5.62 m for the substructure of our window.
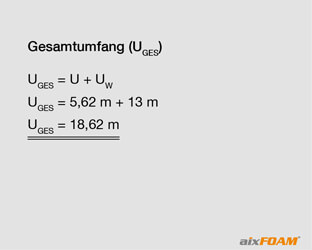
If you add both values, i.e. the edge length of our wall and that of our substructure for the window, you get a total requirement of 18.62 m for square-profile batons and wall covering profiles.
Now that we have determined how many wall covering profiles, square-profile batons and fabric we need, let’s take a look at all of the materials and tools we recommend you have at your disposal to install acoustic wall coverings.
Materials & tools from the aixFOAM shop:
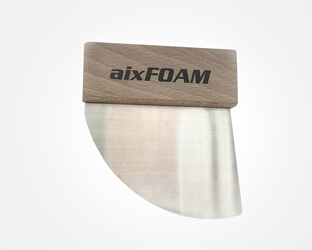
The aixFOAM assembly spatula is a special tool required for tensioning the acoustic fabric. Other conventional spatulas are usually not able to apply the required tension to the material at the outer edges of the profiles. As a result, the fabric cannot be stretched evenly or is even damaged by the excessive effort. For an optimal result, we would therefore particularly like to recommend the use of the aixFOAM EASYfixer (special spatula).
Materials and tools from your preferred construction supplies retailer:

After all preparations have been completed, we can now start building the substructure for our acoustic wall covering. To do this, we build a frame made of square-profile baton around our wall surface, which is simply screwed onto the surface. If you have divided the surface into several segments, these must be framed individually with square-profile batons. The same applies to recesses on windows or doors.
Tip: Before screwing in place, paint the square-profile batons in a colour that matches your acoustic fabric. This way you can avoid possible “colour contrasts” later.
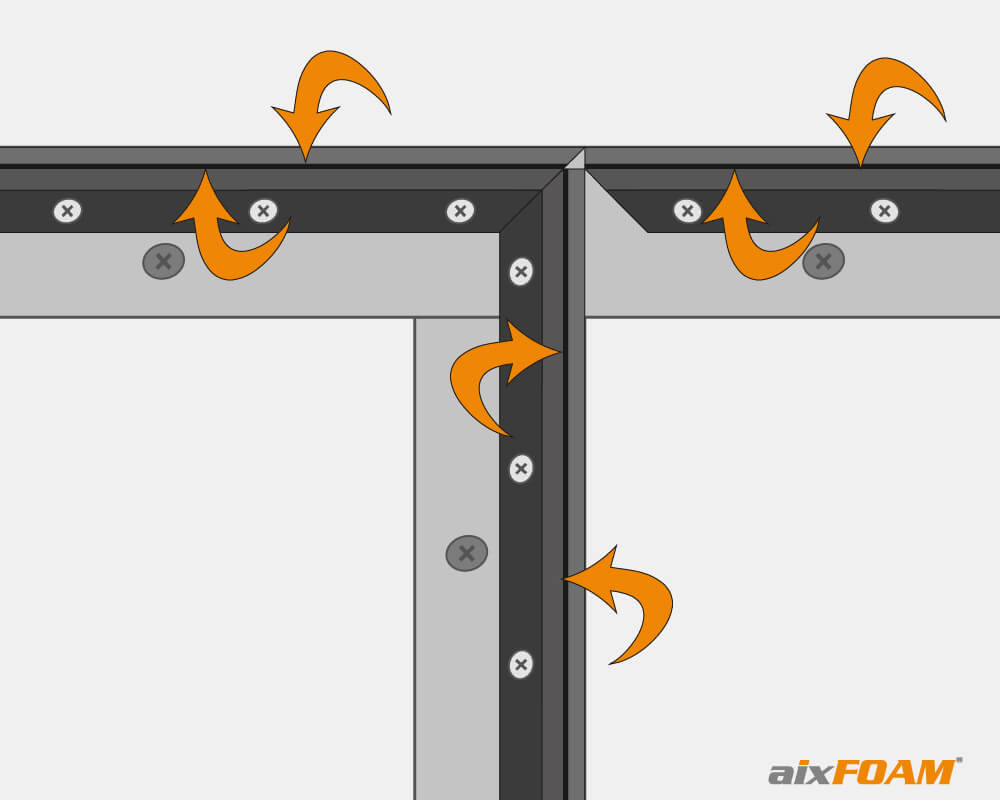
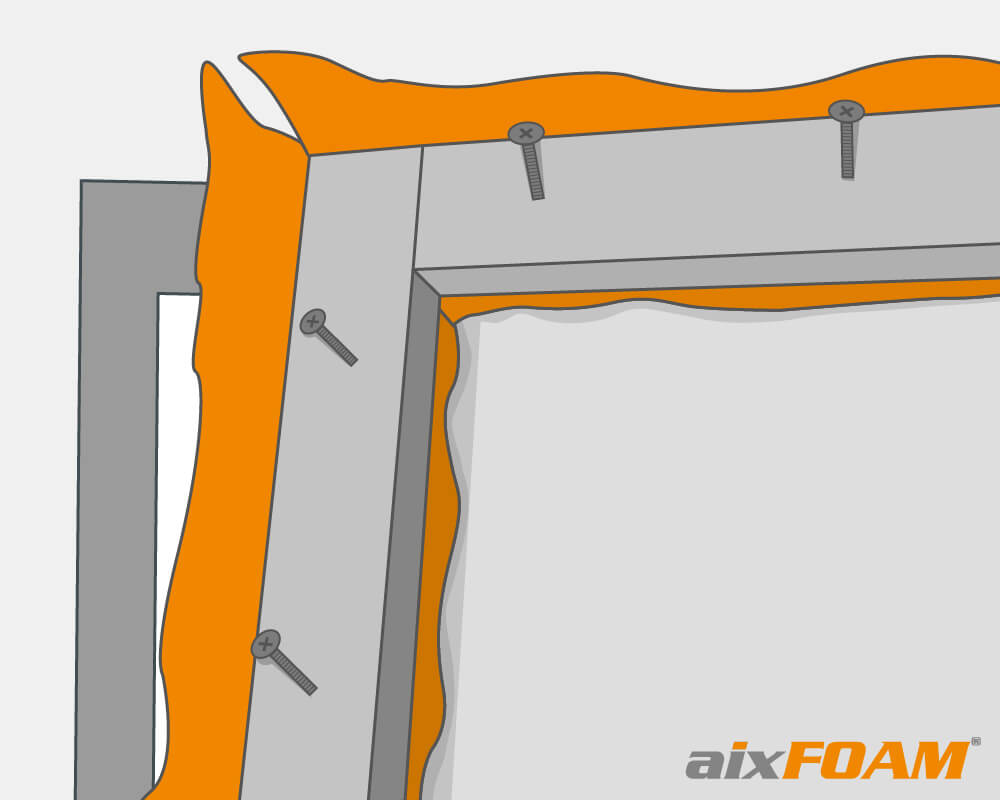
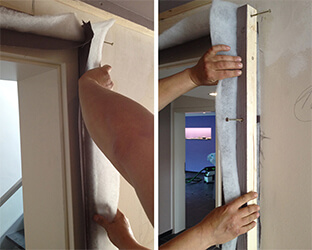
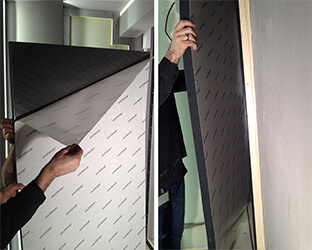
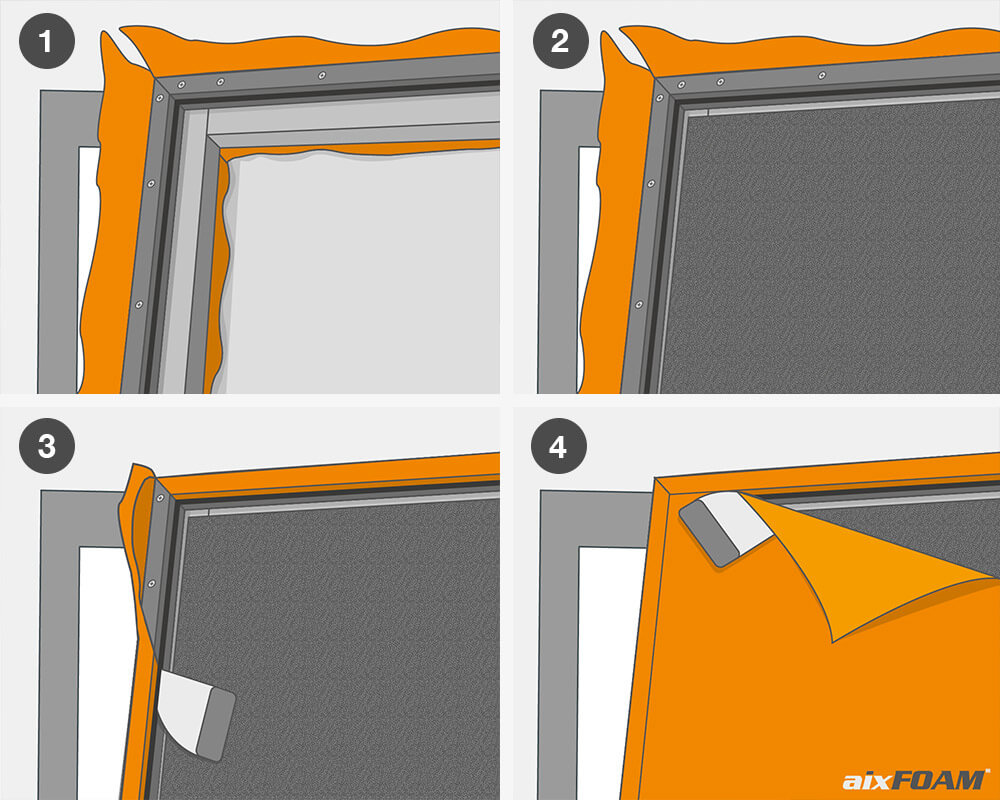
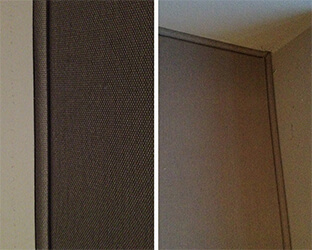
Around doors or windows, the substructure installation procedure is slightly different. For aesthetic reasons, the substructure should also be covered with acoustic fabric on the visible sides of the square-profile batons so that they are no longer visible.
To do this, we first staple a sufficiently wide strip of acoustic material with some adhesive in the area in which the substructure will later sit. The fabric should be placed in such a way that most of it is visible on the outside (visible side) under the square-profile batons. The square-profile batons are then screwed onto the fabric strip in the usual way. The fabric strip is later folded inwards and tensioned over the square-profile batons and the tensioning profile screwed onto it. It should therefore be sufficiently wide (2.5 - 5 cm ), plus a few centimetres of grip.
Note for all perfectionists: In general, it is of course possible to cover all the outer edges of the profiles with fabric. To do this, strips of fabric must be attached under all profiles along the outer edges.
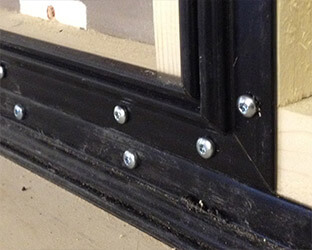
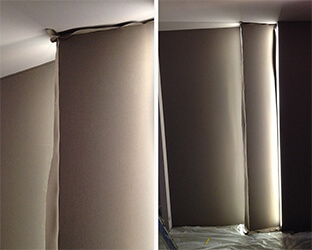
In the following you can see some pictures from our workshop for building the aixFOAM home cinema, in which we also worked with acoustic wall covering.
We explain the further procedure for tensioning the fabric on doors, windows and visible outer edges after inserting the sound absorbers in point 8.1.
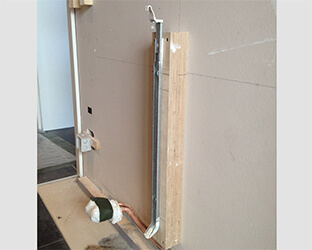
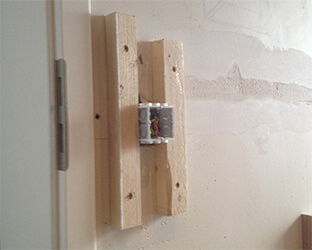
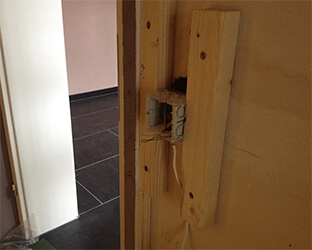
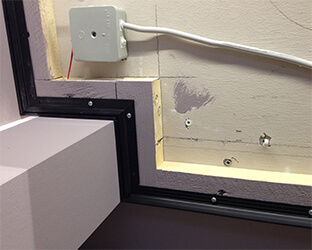
Wall elements such as switches, sockets and radiator suspensions are also later to be integrated into the braced wall and therefore also to be provided with a substructure for height compensation. As a result, the interior or the housing of the switches is behind the wall covering and the visible cover can be attached to the acoustic fabric without pressure. The substructure will later be completely covered by the fabric and will not be visible. Precise preparatory work is also required here.
In the next step, all aixFOAM covering profiles are screwed onto the substructure. For this we recommend the use of short screws with a flat head, as these lie well on the profile.
It is particularly important to work carefully and to ensure that the profiles are connected as seamlessly as possible. Any larger gap at the transitions or joints of the cover profiles would ultimately push through the braced material. For this it is essential to mitre the profiles at the corners.
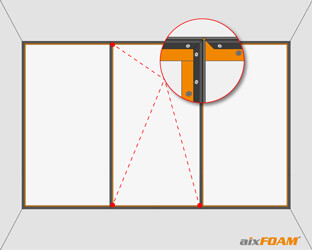
Remember: The clamping profiles can pick up fabric from two directions (see point 4.2), so we only need one profile between two partial segments. All around window or door recesses, the wall covering profiles should be mitred like at the corners of the full-surface wall covering.
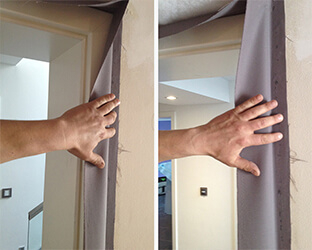
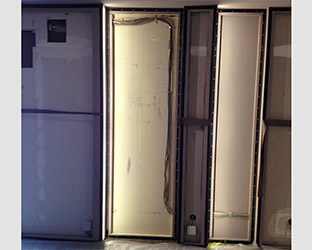
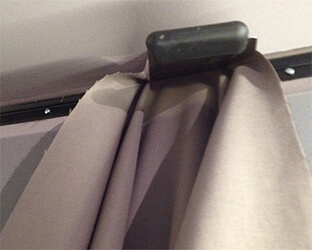
In the following you can see some application pictures from our workshop on building the aixFOAM home cinema.
After attaching the profiles to the entire substructure, the aixFOAM sound absorbers FLAT or sound absorbers FLAT Plus are glued to the wall over their entire surface.
They have to be cut to size in order to fit the absorber plates precisely into the substructure. For this we use a sharp box cutter and a metal bar on which we pull the knife along when cutting. This creates a clean, straight cutting edge. A cutting table or a simple wooden panel is suitable as a cutting surface. The self-adhesive equipment on the back of the sound absorber should point downwards when cut, i.e. it should lie directly on the cutting surface.
To avoid cutting-related accidents, it is advisable to wear cut-resistant protective gloves.
After the sound absorbers have been cut to size, they are glued into our prepared substructure. To do this, we first pull off the liner paper on the back of the absorber only in the upper area. Then we align the absorber in the wall segment accordingly and press the exposed adhesive surface firmly with our hands. Then we slowly pull the liner paper further down and gradually press the entire panel onto the entire surface.
Pressing is an indispensable step in order to permanently fix the absorber - even if the panel apparently already holds. A uniform contact pressure can be achieved very well with standard pressure rollers from the painter's supply.
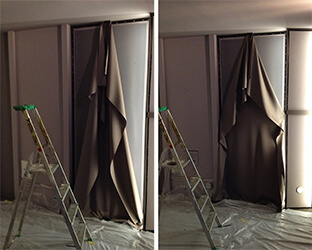
We have also documented the individual processing steps in our workshop for creating our aixFOAM home cinema.
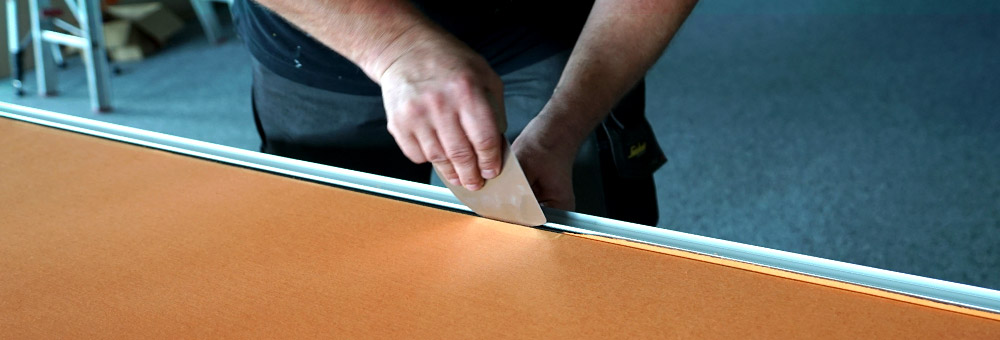
After attaching the absorbers to the wall surface, it’s already possible to make out a strong acoustic effect, which will improve slightly, especially in the high-frequency range, once the acoustic material has been stretched. To attach and stretch the fabric, it is pressed into the profile with a special spatula.
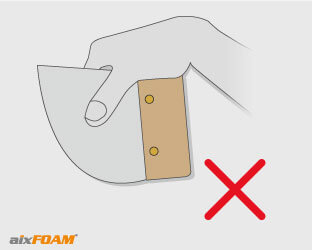
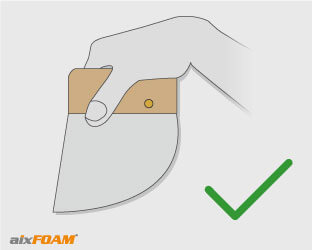
With practice, you will find that it is important to guide the spatula with the correct grip and to allow it to slide into the profile at the smallest possible angle, approx. 10°. Place the spatula as shown in the video below and roll it over the rounded edge. So you can assemble the fabric without much effort.
Since tensioning with the “wrong” technique is very exhausting in the long run, we recommend carrying out some dry exercises beforehand without fabric. This gives you a feeling for the work and quickly recognizes which way the spatula is looking to slide into the profile. Afterwards, the tensioning process is considerably easier and the risk of accidentally damaging the acoustic fabric during tensioning is significantly lower.
First we cut our acoustic fabric with sufficient grip allowance (at least 2.5 cm, but better 5 cm) on each side and to the size of our wall surface.
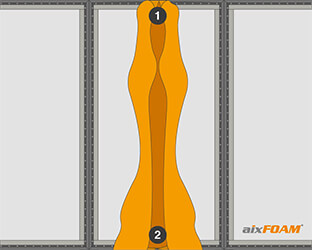
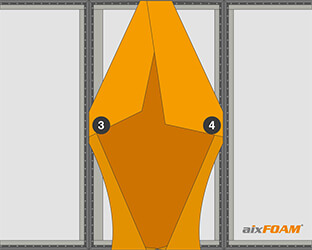
Now the fabric is aligned in the profiles and attached in the centre, pressing it into the profile with a special spatula. Working crosswise. So we start at the top (1), followed by the bottom (2) and then the left (3) and right (4) side.
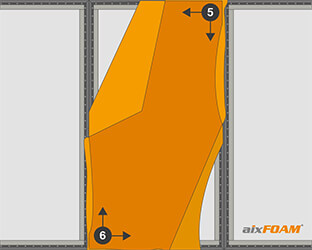
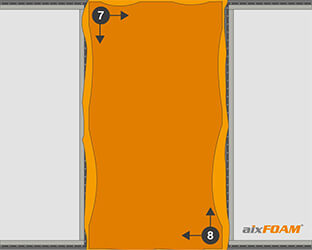
In the next step, the fabric is tacked in the corners, also crosswise. We start in the top right corner (5) and then continue tensioning in the bottom (6) and the top left corner (7). The bottom right corner (8) is braced last.
Finally, the gaps are stretched crosswise alternately. We start at the top (9), continue at the bottom (10) and then left (11) and end the tension on the right side (12).
When generating the final tension, it is very likely necessary to have to loosen the fabric again and re-tension it so that the fabric sits above the absorbers without wrinkles.
We also documented this step in our home cinema workshop.
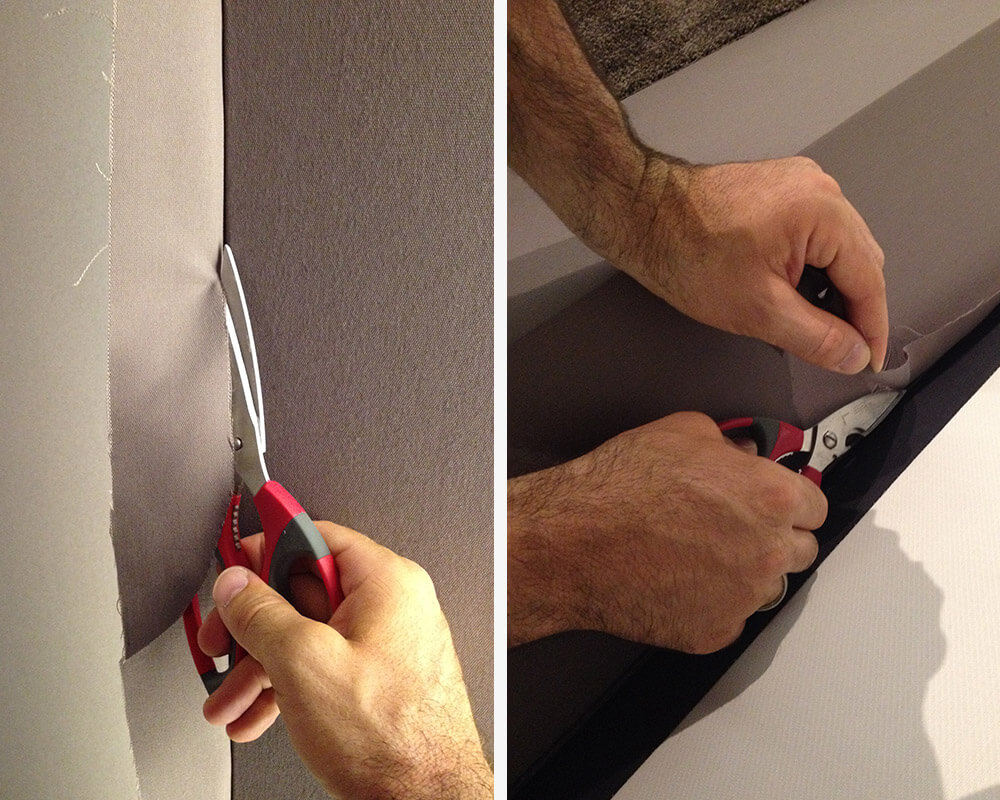
After stretching the fabric, it should now be carefully cut off at the edge and with sharp scissors so that an approximately 5 mm - 10 mm long piece of fabric remains. We take special care not to damage the tensioned surface.
The remaining piece of fabric is now pressed into the profile bar with the assembly spatula, as previously learned, and disappears.
After the fabric has been completely tensioned, the wall covering selected at the beginning in examples 1 and 3 (Points 4.1 and 4.2) can be sketched out as follows:
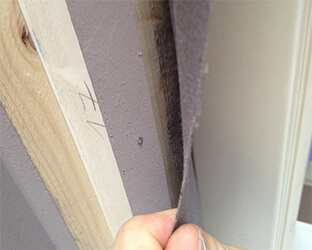
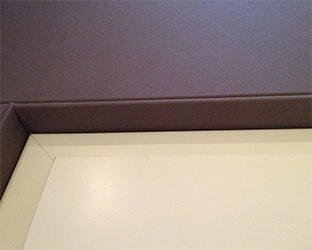
As already described in point 4.2, there are installation situations (windows, doors, visible outer edges) where it is particularly recommended for aesthetic reasons to also cover the substructure - but in the end, of course, it's a matter of taste.
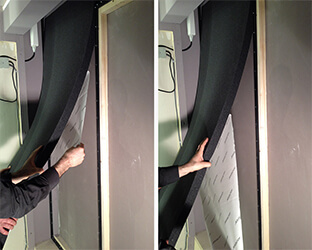
In preparation for this work, a strip of acoustic fabric must be glued under the square-profile batons and attached it to the substructure (see point 5.1).
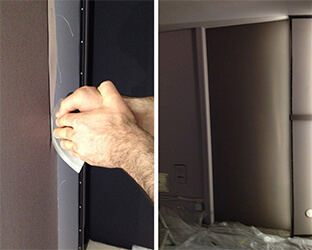
After we have screwed the cover profiles onto the substructure and inserted the sound absorbers, we now fold the fabric strip from the outside inwards over the substructure and profile and press it into the profile with the spatula as usual.
Then the surface can be covered with fabric as described in the previous point.
For our Example 3, i.e. the wall covering with window cut-out, the following sketched view then results:
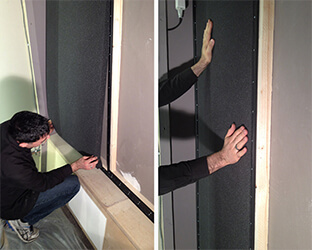
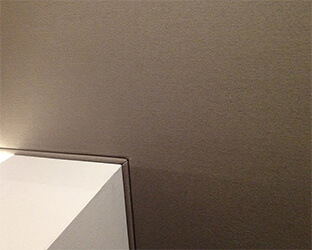
In the following you will find some example pictures of acoustic panelling on the visible outer edges, doors, windows and the wall covering profiles from our aixFOAM home cinema.
All materials for your acoustic wall covering can of course be found in the aixFOAM shop. Discover our large selection of sound absorbers, acoustic materials and accessories for high-quality acoustic solutions. Our specialist planners will provide you with free advice on planning your wall covering.
Click here to go to the top of the post!Acoustic wall coverings are not only popular as a proven means of high-quality interior fittings, but also because of their excellent sound insulation.
In this article you will learn everything about the advantages of acoustic wall covering, the ideal preparation and material planning up to the step-by-step implementation. Let yourself be inspired and easily build your first acoustic wall covering yourself.

Call us or send us an email. Together we'll find the right acoustic solution via a free consultation with our specialist planners.
+49 2403 / 83830 - 22
Monday to Friday
08:00 o'clock untill 17:00 o'clock
sales@aixfoam.com
Daily, 24 hours a day
Visit our aixFOAM store and find your suitable sound insulation: less noise and better acoustics with sound absorbers directly from the manufacturer.
Find your sound insulation